Why DIY Paint-FAQs, Best Practices, Paint Inlay Instructions
DIY Paint ™ is hands down the best artisan clay & chalk finish furniture and home decor paint in the industry.

Handcrafted in the USA using the highest quality NO VOC pigments in the industry. DIY Paint ™ is velvety soft, lusciously creamy, and creates luxurious color dimension you have to see to believe. DIY Paint ™ is eco-friendly containing only (9) nine total ingredients, all natural clay and chalk based paint.
Safe, Easy & Affordable
As a DIYer, do you want to create safely from home? Did you know there is a paint named after us that is safe and sustainable? That’s right, DIY Paint!
The DIY Movement continues to grow and safety is our priority. At Morning Dewdrops, we went from wearing this

..to this…

DIY Paint is safe and sustainable because it has NO VOCs! (volatile organic compounds) DIY Paint contains no acrylic, latex or levelling agents to harm our environment.
DIY Paint only has 9 ingredients and the first is LOVE. DIY Paint is so nontoxic that our standards are even higher than what is required by the cosmetic industry. But Don’t Try To Use as Makeup! LOL!
INGREDIENTS: Love, water, clay, porcelain clay, chalk, alcohol, ester (as a binder), cellulose, pigments, preservative.
When I first started painting years ago, I thought I was using a safe, eco-friendly paint. It said clean up with soap and water and the paint claimed, “low or minimal VOCs,” but there was a health warning on the label. I also had to dispose of the waste safely according to state law. OMG!
In addition, we received a call from a customer who was using another brand of paint with our JRV Stencils. She complained that a film would not come off her stencils. She stated she scrubbed, but the particles floating in the water kept adhering to the stencil. These particles were probably from an acrylic or other bonding agent. Acrylic is added to most chalk-based paints on the market today. Acrylic is a transparent plastic and has a negative impact on our environment. DIY Paint contains no acrylic. Remember NO VOCs!
With DIY Paint, I rinse and clean my brushes in a small bucket, then pour the water out in my backyard.
DIY Paint - Quality & Ease
DIY Paint is so minimal, yet so rich. The foundation (base) is an all-natural clay. Think of a cake – the foundation of a cake is flour to which you add other ingredients. Other brands claim their paint is a clay paint, but it is not the foundation. DIY Paint is
- 5 times more pigmented than other paints
- Thick and Creamy
- A one-step paint meaning no sanding or priming before painting. This is known as No Prep or Minimal Prep.
- And there’s no loss of saturation when mixed with water, so drip away!
Affordability
DIY Paint is competitively priced with similar premium paints, but you also save by doing it yourself.
- Décor on a Budget
- Two Step – Side Step (the expense of paying someone else)
No. 1 Customer Praise – Easy Blendability
Customers find DIY Paint the best for artisans, beginners and experienced, because the paint is a chameleon for furniture or other surfaces because of its blendability. The clay creates highs and lows, so when blending, your whole piece has continuity without having to worry.
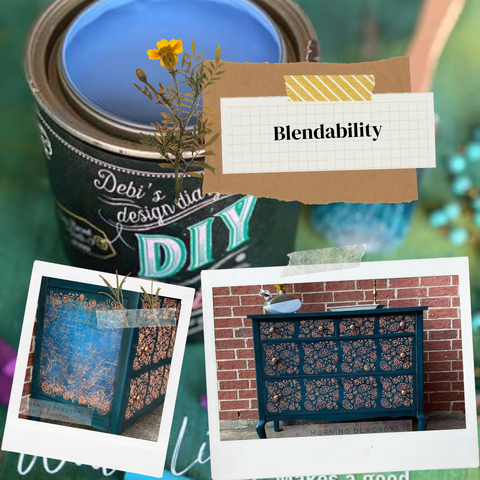
- Want fewer brush strokes? Blend with water.
- Want a century-old patina? Paint it on thick or use a palette knife or scraper to push/pull the paint to create the look of shutters in the French Quarter.
- Want to burnish? Just like burnishing clay pottery.
- Want to see layers? Wet distress before sealing.
- Want easy blending? The clay creates the highs and lows for you without having to worry about matchy-matchy when blending colors.
CRAY, CRAY FOR THE CLAY!
DIY Paint - ONE STEP PROCESS
DIY Paint ™ is of the highest quality clay and chalk based paint on the market, and competitively priced! NO SANDING, NO PRIMING! If you have ever labored over sanding and then priming a piece before you even begin the fun part, you can appreciate how much time and backache this feature saves you! Besides being all natural, eliminating these steps converted me to chalk paint for good! Well, that and the gorgeous results!
DIY Paint - GORGEOUS RESULTS

"Delta", a 1940’s dresser, comes with an oval mirror (not pictured). Delta was painted in Bohemian Blue, French Millinery & Old ‘57 and finished with DIY Big Top, Clear & Dark Waxes. The raised stencils were created using Pennies From Heaven Copper Liquid Patina. The sides were decoupaged with a pretty blue/copper paper.
DIY Paint ™ does not contain any Latex or Acrylic!
ONLY 9 INGREDIENTS + LOVE!
DIY Paint is clay and chalk based with a high quality dream finish. After just a simple application, I’ve transformed pieces from trash to treasures, and have seen people who claim to have no talent impress themselves with professional-looking results, as well as surprise their families.
INSTRUCTIONS
1. Clean & Dry object to be painted.
2. Remove lid & stir thoroughly. (Sometimes you don't even need to stir our paint! It's that good)
3. Apply one coat & allow to dry. (15 min to a few hours to dry, depending on climate)
4. Apply second coat, if needed.
5. Allow second coat to dry.
6. Seal surface with DIY Paint Finishes
DO NOT FREEZE!
_____________________________________
DIY CLAY & CHALK PAINT FACTS & FAQs
What is the difference between DIY paint and other brands?
DIY Paint is a nontoxic, all-natural clay and chalk-based paint (water-based). The clay is the magic ingredient which gives it the unique ability to create a variety of textures from smooth to chippy. DIY Paint is one of the most affordable brands on the market because it goes right from the factory to the retailer. The excellent quality of DIY Paint is due to the selection of the best pigments and ingredients.
Is DIY Paint affordable?
DIY Paint is one of the most affordable premium paints of its kind on the market. I cannot put a price on my health and do not want to contaminate our environment. DIY Paint smells like earth and is safe enough for kids. DIY Paint contains no VOCs, latex, acrylic or other harmful binders.
The natural clay base is its champion! DIY Paint is five times more pigmented that its competitors. The blend-ability is second to none and adding water does not dilute the paint color. Artists paint their canvases with DIY Paint. The clay base allows for subtle undertones and nuances of color that you cannot achieve with other premium paint brands of its kind.
DIY Paint is easy, a little goes a long way and the possibilities are endless. If you are still not convinced, try one of our forty-five colors in an 8 oz size. You will be a happy creative! And please let us know what you think.
Can you paint on laminate and other surfaces?
Yes, DIY Paint is designed primarily to paint on furniture with no need for sanding or priming before you begin. The paint also adheres to surfaces including metal, plastic, laminate, and glass. (A light sanding with a fine grit sanding block may be used on shiny, slick surfaces. Keep in mind this is one only to rough up the surface a little.)
What is the best practice before painting?
The number one thing to do first is clean surfaces to remove any residue for better adherence.
Why is the first coat of paint not a full coverage?
More than likely, you will not get full coverage on your piece with the first coat. This is the stage before beauty. Try not to go over areas you have already painted with your brush when applying the first coat. Allow the first coat to dry, then apply the second coat.
DIY Paint is a thick and highly pigmented paint, so you only need a small amount of paint on your brush. Using a quality brush is a dream and a tool you will want to invest in. In addition, keep a misting spray bottle handy. See upcoming and current video tutorials on our YouTube channel.
Why is DIY Paint a lighter color when dry?
DIY Paint will appear lighter when it is dry compared to when it is wet. This is natural. The rich paint color will return once the piece is sealed with a wax or topcoat.
Does DIY Paint need to be sealed?
Yes, DIY Paint needs sealing with a wax or topcoat because it is a natural clay-based and chalk-based paint with no VOCs, harmful binders or acrylics.
What White in DIY Paint do I choose?
DIY Paint White Swan is our truest, pure white. The other “Whites” in the DIY Paint line have cool or warm undertones to match your palette. Bead Board is our white with cool undertones (cool palettes). Vintage Linen is out white with subtle beige undertones (warm palettes). Crinoline is our creamiest white with pale yellow undertones (warm palettes). Tarnished Pearl is our white with subtle grey undertones (cool palettes).
What is “bleed through” and how is it prevented when painting on wood?
Darker woods like cherry and mahogany naturally contain darker tannins. “Bleed through” refers to the tannins in the wood coming through when you paint; therefore, do a test in a small area before painting darker woods. You have “bleed through” if you see a brownish or reddish tint appear once the paint has dried which means the tannins blead through the paint. Some people do not care if the tannins bleed through and often the tannins do not considerably change the paint color. However, we recommend and have a solution and that is DIY Paint Salvation Solution. Applying Salvation Solution first solves the “bleed through” problem. DIY Paint Salvation Solution is available in clear and white. Use the clear Salvation Solution when painting with darker colors and use the white when painting with lighter colors.
TIP: Let’s say you are painting a piece in DIY Paint Aviary (a farmhouse, olive green). You can add a small amount of grey paint to the white Salvation Solution to make it easier when painting with the Aviary because it is easier to cover over a light grey than a white. (Of course, you would not do this is you were painting your piece in a lighter color such as DIY Paint Vintage Linen (one of our whites with creamy beige undertones). FYI – Clear Salvation Solution contains no color pigments, so do not add paint color to it; its purpose is to remain clear.
What is the best practice when applying clear wax or colored waxes?
DIY Paint Clear Wax - Put a small amount of wax on your brush or use a rag to apply the clear wax. Only the tip of your brush should have wax on it. Using a premium brush specifically made for applying wax is ideal. Offload your brush onto a piece of cardboard to allow the wax to evenly distribute on the brush. Let the first coat dry and then apply a second coat of clear wax. Wait 24 hours and buff with a clean, lint-free rag. You can use your piece after seven days (i.e., putting items in drawers), but the full curing time is 30 days. We do not put anything on the surface of our pieces until after the wax has fully cured.
DIY Paint Colored Waxes are heavily pigmented, so apply the colored wax sparingly and always offload onto a piece of cardboard before applying.
We always apply clear wax before applying colored wax (i.e., dark, black, etc.). Applying the clear wax first acts like an eraser should you need to remove any of the colored wax. In addition, waiting about twenty minutes for the clear wax to penetrate the paint before applying the colored wax will insure the colored wax will stay its true color.
It helps to spoon out a small amount of wax onto a piece of cardboard or paper plate to use when getting ready to apply your wax, so the wax in the container does not get contaminated. Lastly, use a different wax brush to apply the colored waxes.
can also be used as a clear barrier layer BEFORE applying tinted and colored waxes. Apply 1 thin coat of clear topcoat or sealer BEFORE applying waxes. Allow clear topcoat or sealer to dry for minimum of 24 hours before applying waxes. (DIY FINISHES)
We do not typically recommend applying clear topcoats or sealers over OVER waxed finishes. With waxed surfaces there are a lot of variables – thickness of wax, type of wax, solvents used in wax formula, number of layers of wax, dry time between layers, how much the wax was buffed, and cure time of wax. All of these variables make layering another product over wax potentially problematic. For most wax products, an additional sealer is not required over the layer of wax. In most circumstances, if using wax to seal, wax should be the final layer to seal chalk painted surfaces.
What is the curing time for DIY Paints and Finishes?
To be fully cured is about 30 days. After seven days, the paint and/or finishes will be somewhat cured and can be used gently; however this depends on weather conditions, temperatures and humidity. For example, if you have a dresser, you can place items in the drawers, put do not put anything on top of the dresser for 30 days.
Can you paint on fabric or upholstery?
Yes, tightly woven fabrics work best to paint as they do not absorb as much of the product. If painting upholstery, it is best to work with lighter fabrics or to select a paint color darker than the color of the original upholstery.
Can you paint on leather?
Yes. You can basically paint on anything. It is a good practice to do a test first because sometimes pre-existing factors may affect the outcome.
What is wet distressing?
Wet distressing is an impressive attribute with DIY Paint! DIY Paint contains no latex or acrylic, so you can rub the paint back with a wet cloth or a wet sanding block, even a baby wipe will do the trick.
Sandpaper is good for some projects, but over-sanding can leave a furniture piece looking like you tied it behind a pickup truck and drug it down a gravel road. On the other hand, wet sanding allows you to create a look of paint worn down over time.
Sanding is time consuming and leaves a dusty mess. Rubbing paint off is much faster and dust free.
Sanding can damage wood especially ornate or carved areas. Wet distressing is the perfect alternative and a beautiful way to highlight those curves and scrolls.
How do I mix colors?
DIY Paint is water-based and mixes like any other paint. When mixing, start with your lighter shade and add tiny amounts of the darker shade and mix until the color you desire.
How do I make a chalkboard?
Any color of DIY Paint can be used as the base of a chalkboard! The paint has a natural matte finish, so while colors like Weathered Wood or Letterpress Grey will give you the classic slate look, you can write with chalk and erase just as easily with any of the amazing colors.
Start with a smooth, clean surface and apply at least three layers of DIY Paint with a satin-finished roller to avoid brush strokes and texture. When the paint has dried thoroughly, use the side of a piece of chalk to "prime" the board by completely covering it evenly with a layer of chalk and then erase it.
______________________________________
Best Practices Painting With DIY Clay & Chalk Paint
Supplies
- Drop Cloth to protect area (especially if paint in your home).
- DIY Paint
- Brush(es)
- Paper plate
- Spray bottle (Fine Misting bottle preferred).
- Paper towels or baby wipes (optional)
- Sanding block, paper bag or craft paper (optional)
Brushes - DIY Paint works best with synthetic brushes because you will see less brush strokes than with a natural bristle brush. A quality brush is a sound investment; it is a tool used to create like a Pro and saves you time because it is doing the demanding work for you (less mistakes and frustration). I have worked with inexpensive and expensive brushes and know there is a difference, but why pay more when you do not have to. Morning Dewdrops found just the right brushes at moderate prices in comparison to higher priced brands with the Artisan Enhancement brushes.
Preparation – DIY Paint is a minimal prep paint, but you need to prep your piece first.
- Cleaning your piece is crucial. You can clean your piece with Dawn dishwashing liquid or Borax (follow instructions) and other safe cleaners. Dawn and Borax are inexpensive, easy to use and do not harm the environment. Dawn and Borax can kill fungus and strip away dirt and grease on porous surfaces such as wood or cement.
- Clean surface with cleaner and water. Scrub with rag to make sure you get off the grime and build up.
- Then take clean water and rag and rinse well. Do not leave out this step no matter what cleaner you use. Residue from a cleaner can hinder painting any surface.
- Does your piece require any repairs? If so, make those repairs.
- Is the wood dark, like mahogany or cherry? The tannins in dark wood could bleed through the paint color. See “bleed through” below.
- Is the surface of the piece super shiny, if so, you may need to scuff it up a bit with a “very light” sanding. You are not really sanding, you are just scuffing up the surface, not really sanding away any of the surface. I sometimes take a paper bag or craft paper and rub over shiny surfaces to scuff them up.
Sample Boards Will Save You Time.
When I am trying out a new technique or new color combo, I experiment with sample boards until I get the desired effect I want. You learn this way in little time; I have made horrible mistakes on sample boards, but I have also created beautiful “mistakes” that turned out to not be mistakes at all. You can use any scrap of wood or even cardboard as a sample board for practice.
What is “bleed through” and how is it prevented when painting on wood?
Darker woods like cherry and mahogany naturally contain darker tannins. “Bleed through” refers to the tannins in the wood coming through when you paint; therefore, do a test in a small area before painting darker woods. You have “bleed through” if you see a brownish or reddish tint appear once the paint has dried which means the tannins blead through the paint. Some people do not care if the tannins bleed through and often the tannins do not considerably change the paint color. However, we recommend and have a solution and that is DIY Paint Salvation Solution. Applying Salvation Solution first solves the “bleed through” problem. DIY Paint Salvation Solution is available in clear and white. Use the clear Salvation Solution when painting with darker colors and use the white when painting with lighter colors.
TIP: Let’s say you are painting a piece in DIY Paint Aviary (a farmhouse, olive green). You can add a small amount of grey paint to the white Salvation Solution to make it easier when painting with the Aviary because it is easier to cover over a light grey than a white. (Of course, you would not do this is you were painting your piece in a lighter color such as DIY Paint Vintage Linen (one of our whites with creamy beige undertones). FYI – Clear Salvation Solution contains no color pigments, so do not add paint color to it; its purpose is to remain clear.
Test for Bleed Through
It is imperative to check for tannins that might bleed through before you paint if you are working with a dark wood (cherry or mahogany, etc.). If you are unsure, testing for bleed through will still be beneficial especially if using a lighter color. Apply a batch of paint to a piece in an obscure area, like in the lower side corner of a piece and let that dry. You make apply a second coat. While painting on a second coat, do you notice the paint taking on a brownish or reddish tint? Or when the paint is dry, do you notice a brownish or reddish tint? If so, then it is Salvation Solution to the rescue in either white or clear.
How I Paint with DIY Paint
- Do not use too much paint.
- Use long brush strokes and do not overwork the paint by brushing over the wet paint.
- Your first coat may not have full coverage. That’s okay.
- Since the paint is highly pigmented, I like to wait two hours before applying my second coat. Sometimes it requires overnight to dry, but that is usually when I have applied a thick layer with a darker color that has more pigmentation vs a lighter color. Weather conditions, especially humidity, also effect drying time and I live in the South (very humid). Any clay-based paint is going to reactivate if moistened with water, paint or any finishes.
- On your second coat, use a light stroke. Do not press hard and keep paint on our brush. Do not keep going over the same area. You can spritz your brush with water and then dip it in the paint especially if you notice your brush starting to drag across the painted area.
TIPS
- DIY Paint is so thick; it hardly ever separates. I like to stir the paint rather than shake it. I use a painters stick or large popsicle stick.
- I do not paint from the paint container. I use paper plates or paper cups to hold my paint to avoid contaminating the paint especially when using assorted colors.
-
Optional (if needed after final coat of paint has dried) - To produce an even smoother surface on the top of a piece and further minimize brush strokes, I sometimes apply what I call the “Color Wash Effect.” Since adding water to the paint does not compromise the paint color, I create a color wash by taking a small amount of paint on my brush tips and dipping my brush into a cup of water (small amount no need to measure) and swirl it around.
- Dip your brush into the color wash and off-load the excess onto a paper towel or rag. You want your brush saturated, but not with excessive dripping.
- Brush your color wash over the top of the piece in long strokes across the top of your piece in the same direction. Let dry.
You will see while it is drying that the color wash has reactivated some of the painted surface and the additional water will further smooth out any irregularities in thickness and minimize brush strokes even more. The “Color Water Effect” is doable because DIY Pain has no binders or sealers to get in the way. So easy to reactivate.
Why is DIY Paint a lighter color when dry?
DIY Paint will appear lighter when it is dry compared to when it is wet. This is natural. The rich paint color will return once the piece is sealed with a wax or topcoat.
Does DIY Paint need to be sealed?
Yes, DIY Paint needs sealing with a wax or topcoat because it is a natural clay-based and chalk-based paint with no VOCs, harmful binders or acrylics.
Blending Paint Colors
No. 1 Customer Praise – Easy Blendability
Customers find DIY Paint the best for artisans, beginners and experienced, because the paint is a chameleon for furniture or other surfaces because of its blendability. Remember there are no binders or sealers to get in the way when blending. The clay creates highs and lows, so when blending, your whole piece has continuity without having to worry even when adding water.
- Want fewer brush strokes? Blend with water.
- Want a century-old patina? Paint it on thick or use a palette knife or scraper to push/pull the paint to create the look of shutters in the French Quarter.
- Want to burnish? Just like burnishing clay pottery.
- Want to see layers? Wet distress before sealing.
- Want easy blending? The clay creates the highs and lows for you without having to worry about matchy-matchy when blending colors.
When blending, feather with a light stroke and a little paint. Keep the paints wet and I like to blend in sections. I work from a palette (usually a paper plate) and have the colors I am going to use for blending. Two to three colors work best for blending. Keeping the spray misting bottle handy works best when blending colors.
Wet Distressing
Wet distressing is an impressive attribute with DIY Paint! DIY Paint contains no latex or acrylic, binders, or sealers, so you can rub the paint back with a wet, lint-free cloth or a wet sanding block. I prefer using a wet, lint-free cloth (old t-shirts).
Sandpaper is good for some projects, but over-sanding can leave a furniture piece looking like you tied it behind a pickup truck and drug it down a gravel road. On the other hand, wet sanding allows you to create a look of paint worn down over time.
Sanding is time consuming and leaves a dusty mess. Rubbing paint off is much faster and dust free.
Sanding can damage wood especially ornate or carved areas. Wet distressing is the perfect alternative and a beautiful way to highlight those curves and scrolls.
TIP: Since DIY Paint is reactivated with water, wet distressing can easily take off some of the paint down to the wood color. This is usually the effect people want. However, if you are only wanting to wet distress down to the first color you applied, you can always seal the bottom layer of paint and when you wet distress, the distressing will only distress to the first layer of paint.
What is the best practice when applying clear wax or colored waxes?
DIY Paint Clear Wax - Put a small amount of wax on your brush or use a rag to apply the clear wax. Only the tip of your brush should have wax on it. Using a premium brush specifically made for applying wax is ideal. Offload your brush onto a piece of cardboard to allow the wax to evenly distribute on the brush. Apply the wax with the brush first going over the piece in sections and when you have completed one section (side or top), take your wax brush and brush with long strokes in one direction (without adding additional wax) to ensure an even coat of wax in all areas.
I like to apply two coats of wax and wait about thirty minutes to an hour to allow the first coat of wax to absorb into the paint.
Some people after waxing kind of freak out (LOL!). We call this the freak-out factor because your piece might look patchy. This is common because the wax absorbs into the paint over time. This is when you will also see the color deepen into a rich color (like from the container).
Allow 24 hours for the wax to absorb into the wood, then buff with a clean, lint-free rag. Buffing enhances the highs and lows of the beautiful artisan clay. The more you buff the more the piece will shine.
You can use your piece after seven days (i.e., putting items in drawers), but the full curing time is 30 days. We do not put anything on the surface of our pieces until after the wax has fully cured.
Tip: It helps to spoon out a small amount of wax onto a piece of cardboard or paper plate to use when getting ready to apply your wax, so the wax in the container does not get contaminated. Lastly, use a different wax brush to apply the colored waxes.
DIY Paint Colored Waxes are heavily pigmented, so apply the colored wax sparingly and always offload onto a piece of cardboard before applying.
We always apply clear wax before applying colored wax (i.e., dark, black, etc.). Applying the clear wax first acts like an eraser should you need to remove any of the colored wax. In addition, waiting about twenty minutes for the clear wax to penetrate the paint before applying the colored wax will insure the colored wax will stay its true color.
Can I layer sealers and waxes? Topcoats and Sealers can also be used as a clear-barrier layer BEFORE applying tinted and colored waxes. Apply 1 thin coat of clear topcoat or sealer BEFORE applying waxes. Allow clear topcoat or sealer to dry for minimum of 24 hours before applying waxes. (DIY FINISHES)
We do not typically recommend applying clear topcoats or sealers OVER waxed finishes. With waxed surfaces there are a lot of variables – thickness of wax, type of wax, solvents used in wax formula, number of layers of wax, dry time between layers, how much the wax was buffed, and cure time of wax. These variables make layering another product over wax potentially problematic. For most wax products, an additional sealer is not required over the layer of wax. In most circumstances, if using wax to seal, wax should be the final layer to seal chalk painted surfaces.
Sealing Your Piece with DIY Big Top Topcoat
Big Top is a water-based topcoat and is non yellowing with high durability and a satin sheen. For best results, we like to wait 24 hours before applying Big Top. Weather conditions play a big part as to when to apply Big Top and we have high humidity, so we wait 24 hours to apply our topcoat. There is less chance of the paint lifting off just in case we applied thick coats; darker pigments tend to take longer to dry.
You can use a roller or a brush to apply Big Top. We like to use the oval brush by Artisan Enhancements because this brush is made for applying topcoats and leaves minimal brush strokes. Another tip is to apply Big Top in thin layers. You only need to get the tip of your brush into the Big Top. You can spoon Big Top onto a paper plate to avoid the possibility of contamination. We wait at least two hours before applying a thin second coat.
Try not overwork when applying Big Top by going over the same areas.
We sometimes notice when applying the Big Top that a few tiny pieces appear and do not seem to brush away. This is okay; it is because of the natural ingredients and these tiny pieces will absorb as Big Top dries.
Do not freak out if you see batches of irregularities when Big Top is drying. We call this the Freak Out Factor LOL! This is the topcoat absorbing into the paint and it dries and some areas dry quicker than others.
As stated above, the paint color will be richer after applying wax or a topcoat. Big Top creates a subtle sheen that enhances the highs and lows of the clay-based paint; it is so naturally appealing to see these nuances within the overall look of the piece.
What is the curing time for DIY Paints and Finishes?
It takes about 30 days for your piece to fully cure. After seven days, the paint and/or finishes will be cured to the touch and can be used gently; however, this depends on weather conditions, temperature and humidity. For example, if you have a dresser, you can place items in the drawers, put do not put anything on top of the dresser for 30 days.
Gold and Cooper Liquid Patinas
You do not have to seal the gold or cooper DIY Liquid Patinas. The liquid patinas have a sealer mixed into the liquid patina.
However, you need to apply the gold or copper liquid patina before you apply the wax if you are sealing your overall piece with wax. Let the patina dry preferably over night before applying the wax.
If sealing your overall piece with Big Top, then apply the gold or cooper liquid patina after applying the two coats of Big Top. Wait at least two hours before applying the gold or cooper liquid patina after applying your second coat of Big Top. The gold or copper patina will lose its lustre if you apply Big Top over the gold or copper patina.
_____________________________
PAINT INLAY DESIGNED BY DEBI BEARD - DIY PAINT
What are IOD Paint Inlays?
IOD Paint Inlays are ground-breaking, first-in-class, premium art products that will revolutionize the DIY industry and empower creative exploration across all skill levels. In short, they are AH-MAZING, if we do say so ourselves. (Three years in the making so we love them like our kids!)
IOD Paint Inlays are the artisanal answer to decor transfers. They’re not a decal; they’re not a synthetic film; they’re not decoupage. When you apply an IOD Paint Inlay, paint is physically embedded into the surface of your project. After drying, the carrier paper is removed, leaving an authentic painted design and a buttery, almost leather-like surface on your piece.
How do IOD Paint Inlays work?
IOD Paint Inlays are made from proprietary artist-quality paints that we formulated specifically for decorative use. Organic in nature, the Paint Inlays transfer the painted design yielding a slightly varied and uniquely beautiful aesthetic each time they’re used. The results are visually interesting, texturally complex, and often inherently distressed. The paint formula is 'active' until sealed. That means that you can manipulate it and apply special techniques or a custom touch before you seal your piece.
CREATING SAMPLE WOODEN BOARDS OR SAMPLE CANVAS OR SAMPLE FABRICS OR SAMPLE GLASS ITEMS ARE HIGHLY RECOMMENDED AND BY FOLLOWING THE STEPS BELOW DEPENDING ON YOUR SURFACE/SUBSTRATE.
Can IOD Paint Inlays be used more than once?
And, as if once isn't enough, you can usually get a beautifully faded second impression, with the residual pigment on your 'leftover' Paint Inlay sheets. Depending on the techniques and colors you are using with your Paint Inlay, sometimes you can even get a third impression!
IMPORTANT NOTE: For best results with a basic application, use a chalk-type paint that does not contain polymers. (Polymer-based paints and topcoats can also be used, but the timing and results vary, so check out our tutorials for that and more special technique videos coming soon.) How do I use IOD Paint Inlays?
Basic Steps for Use
Step 1: Plan the layout of your designs for your surface.
Step 2: Using the grids on the backside of the inlay sheet, trim as needed and set aside. If you are using a repeat pattern and lining the pattern up continuously, then trim the excess margin on each sheet.
Step 3: On an appropriately prepared surface, apply a generous and even coat of mineral-based chalk-type paint. Work in small sections to manage the paint-drying window as you work, generally not larger than 12"x16".
Step 4: While the paint is still wet, lay the paint inlay sheet, design side down (grids are printed on the back for easy identification of front and back), into the wet paint, keeping it taut.
Step 5: Spritz lightly with an even mist of water. Using a smooth damp sponge or the IOD Silicone Paint Blade, pat down with even light pressure to make sure the design makes good contact with the painted surface. Avoid excessive moving or dragging of the Paint Inlay sheet once it is laid down, as this can cause blur or smear.
Step 6: Repeat steps 3-5 to complete your design, lining up your sections as appropriate. The gridlines can help to match pattern edges when needed.
Step 7: Allow the Inlay to dry to the touch. Drying times can vary anywhere from 10 minutes to one hour, depending upon conditions.
Step 8: When ready to remove the Paint Inlay sheets from your surface, spritz evenly with water, and allow 30 seconds to absorb; this helps the backing to release. Starting at one corner, gently pull the paper up, keeping it at a low angle. It should come up easily without tearing. If it does not, spritz a second time and wait a moment, then try again.
Step 9: If desired, you can use water to blend out or soften the design, because the pigment is still movable and active. You can even add additional colors.
Step 10: Once you’re happy with the Paint Inlay design, allow your project to fully dry. Dry time will vary depending on the thickness of the paint coats, how much water was used in the process, the room temperature, and weather conditions. If the surface is cold to the touch, it is not completely dry. To be sure, wait 24 hours.
Step 11: Now, it’s time to seal it. How do I seal after using an IOD Paint Inlay?
There are a few different options for sealing:
- Spray on a water-based sealer of choice using a spray gun designed for paints and finishes.
- Apply a brushed on water-based polyurethane-type sealer directly over your work. This method is likely to result in some pigment migration; this is minimized by avoiding overworking.
- Create a “mistable” setting spray using a 50/50 mix of water and your favorite water-based sealer. Apply with a fine spray mister. Allow it to dry completely and then apply your brushed-on sealer.
- Set your work initially with a commercially available spray-on sealer or artist's fixative. Allow it to dry completely and apply your finish of choice.
- You can also use wax to seal your piece. Apply according to the manufacturer's directions and buff to a sheen as usual.
- Some oil-based finishes can be applied directly by brush to the surface without reactivating. Test in a small area before applying. Note that most oil-based finishes do tend to discolor to amber with time, and that is most noticeable on light colors.
- IMPORTANT NOTE: Always check for compatibility between sealer/finish products when using more than one. How do I store my IOD Paint Inlay? Keep your Paint Inlays stored in the packaging at room temperature, in a dry area, until ready to use. Always handle your Paint Inlay sheets with care and keep them completely dry until ready to use. After use, lay the sheet on a flat surface, pigment side up, and allow to dry completely. If you saved the protective tissue, use these between the saved inlay sheets. Then you can put them back in the packaging until you’re ready to use for a second impression.
What else can I use IOD Paint Inlays on?
IOD PAINT INLAYS ON FABRIC IOD Paint Inlays can be used on fabric with a quality fabric medium and, YES, you can get more than one impression even on fabric! For this application, we used GAC 900 by Golden.
IMPORTANT NOTE: When using IOD Paint Inlays on fabric, the results will vary dramatically depending on the composition of the fabric, its texture, and the application process. Test on a small fabric sample. Using the Inlays on fabric is not an exact science - experiment and have fun, but keep an open mind! To use IOD Paint Inlays on fabric WITHOUT painting the fabric first:
Step 1: Dilute the GAC medium to 50/50 GAC/WATER and put it in a spritzer bottle or a dish with a brush.
Step 2: Apply the mixture to your fabric.
Step 3: Apply the mixture to the face of your inlay. This is the side with the painted designs on it.
Step 4: Place the Inlay face down onto the wet fabric. The grid lines will be facing up at this point.
Step 5: Apply pressure using a variety of techniques depending on the look you’re trying to create. This could be rolling the back of the Inlay with a brayer, blunt tapping, covering it with a thin mount and then sliding a blunt object over it to create contact -- or any other creative way come up with. Again, this is a great place to experiment!
Step 6: Allow the fabric and the Inlay to dry (do not remove the Inlay from the fabric yet).
Step 7: Dampen as you would in the instructions for the traditional use of the Inlay and remove the carrier paper.
Step 8: Spritz the paint pattern with diluted GAC (50/50).
Step 9: Allow it to dry and cure for a minimum of 24 hours.
Step 10: Heat set with a dry iron (no moisture or you’ll reactive the paint).
To use IOD Paint Inlays on fabric when you paint the fabric first:
Step 1: Dilute the chalk-type paint to the consistency of cream.
Step 2: Mix a 50/50 ratio of GAC with diluted paint.
Step 3: Apply a coat of the paint/GAC mixture to the fabric with a brush.
Steps 4 through 10 are the same as above (without the painted background).
IMPORTANT NOTE: We always prefer cotton or high cotton blends for textile projects as they generally produce the best results. Different weaves of fabric will have varied results. For example, a soft cotton jersey tends to give a soft blurred effect, whereas a muslin type of weave will give a crisper image.
IOD PAINT INLAYS ON GLASS IOD
Paint Inlays can be used on glass using a clear medium that’s been formulated specifically for glass adhesion. For this application, we used Dishwasher-Safe Mod Podge. To use IOD Paint Inlays on Wavy Glass Projects
Step 1: Thoroughly clean the glass.
Step 2: Trim inlay and plan the composition with enough spent carrier paper to cover open areas.
Step 3: Coat the glass where you want to use the Paint Inlay with the clear medium. We used undiluted Dishwasher-Safe Mod Podge.
Step 4: Place the Inlay sheet face down (paint side down) and make good contact by rolling the back of the paper with a brayer.
Step 5: Coat the rest of your glass with the medium and apply a spent (used) carrier sheet. The purpose of this is to create a uniform texture on your glass which means no paint is transferred (that’s why you use a carrier sheet that’s completely spent.)
Step 6: Let all the Inlay sheets dry to the touch.
Step 7: Spritz with your medium and then wait a moment for it to saturate the paper. Carefully remove the Paint Inlay sheets.
Step 8: Allow your piece to dry thoroughly.
Step 9: Seal your project by using a fine mist spray bottle filled with the water/Mod Podge mixture. Allow it to fully dry and then apply a second coat of water-based sealer with a brush.
Commonly Asked Questions for IOD Paint Inlays
Q1. Can you seal the Paint Inlays with wax instead of a water-based topcoat? Yes, you can seal with wax as well, but as always, product ingredients vary by manufacturer, and you should always test in an inconspicuous spot.
Q2. How long can you leave the sheets between applications? Can it be months? Theoretically (based on ingredients), indefinitely. Just make sure you store them flat and in a dry, low-humidity environment.
Q3. My local stockist doesn’t carry chalk-type paint. Can I use the IOD Paint Inlays with other kinds of paint? The IOD Paint Inlays were designed to work with chalk and mineral-type paints that do not contain significant amounts of polymer binder. There is a very important working relationship between the paint and the inlay. The paint needs to release the inlay easily after it has completely dried, and been remoistened. You should not have to put a lot of tension on the inlay carrier to remove it, and certainly not enough to tear it. The nature of polymer binders (acrylic for example), is to bind well, which makes them work against the inlay process. In our testing and development, this is evidenced by the carrier fibers that are left in the paint finish when used with some polymer-based paints. HOWEVER, paint ingredients vary greatly by brand, and their performance with inlays varies as well. Generally speaking, some polymer-based furniture paints CAN be used with IOD Paint inlays, with a little extra care in the timing. The same goes for polymer-based clear topcoats. With chalk and mineral-based paints that do not contain significant amounts of polymers, you have a long drying window (they can sit for days before removal without a problem). With furniture paints that have significant polymer binders, you will want to check them and remove them as soon as they are dry to touch, maybe even while still cool from dampness. Know that there is also a likelihood that fibers can be left behind, though it’s often not significant enough to see without a loupe. In our testing, latex paints did not work well with IOD Paint Inlays. Please consult with your local stockist as they can share their experience with the IOD Paint Inlays and their preferred brand of paint.
Q4. You mentioned the Inlay is "active until sealed”. Will the Inlay ever dry if not sealed? The inlay dries quickly. In fact, you should wait until it’s fully dry before sealing, but it will always be active until sealed. Active meaning, it can be reactivated by water.
Q5. What's triggering the inlay to set when a water-based topcoat is applied? Or is it still active beneath the water-based sealer? The sealing mechanism is physical more than chemical. There's no catalyst involved. Think of it the way a mineral-type paint is sealed and how that works. There's a combination of two things, penetration of the coating into the porous material and a barrier.
Q6. Why are we waiting for the paint to dry before removing the carrier sheet? Is it to capture/grab the inlay paint? Yes, in a sense. When the paint dries, the bond between the paint coat and the paint on the inlay is stronger than the bond between the paint inlay and the carrier paper. It basically becomes one with the paint coat. It’s "inlaid" or "embedded.”
Q7. Do the Paint Inlay pads have to remain absolutely flat, or can they be slightly rolled on one end? We *THINK* they can be rolled without damaging the Inlay. However, we recommend storing them flat as it’s easier to apply them when they’re not curling. Additionally, flat storage keeps the covers of the pad flat for restorage of the dry, used Inlay sheets.
Q8. When considering shipping and storage as with other IOD products, are they affected by heat and or cold? Are they more sensitive or more durable than the transfers? In typical heat or cold environments, we believe they are more stable than current transfers. However, heavy moisture situations could affect them. Typical environmental humidity would not be a problem as unused/new Inlays are relatively protected by the cellophane wrapper.
Q9. Can we use a water-base topcoat in a spray or aerosol format instead of mixing water with a water-based sealer? Yes. The dilution technique is just a hack that we like, but only one option. You can absolutely spray a liquid sealer full strength through a sprayer, or use an aerosol option.
Q10. Can we use a dryer to accelerate the drying process? Yes. However, we prefer the drying mechanism of gentle air movement to heat. We use fans a lot, and because of the nature of the paint, much like mineral-based paint, it dries pretty quickly. We avoid drying tools that get very hot, as heat can compromise the stability of paint in general, and cause bubbling or even delaminating of furniture surfaces.
Q11. If I use this on my walls (painted wood panel), will I need to seal it or can I just leave it to dry with the regular paint? Yes, you will need to seal it, unless you are going for an ongoing sort of evolving abstract work of art that includes drips and kid smudges and...
Q12. Will this work over mildew-resistant paint? We don't know about the mildew-resistant paint, but since it's not chalk-type paint and probably is very polymer-based, it would likely work differently and need some fuss. If you want to use a mildew-resistant paint, we recommend you do the following:
- Paint the surface with mildew resistant paint
- Coat the surface with a mineral type paint (over top of the mildew resistant paint)
- Apply the IOD Paint Inlay ● Seal as directed and, perhaps, add an additional coat of sealant for durability
Q13. To avoid repainting a piece, is it possible to use an adhesive like peel stop and lay the paint inlay on that? Or a glaze? Or Modge Podge? Or a water-based sealer? What about Clear Chalkboard paint? See question #3. You can inlay it into clear topcoats, with special considerations for timing. Different brands of topcoats/sealers and polymer-based paints will be more forgiving with IOD Paint Inlays than others. For example, some non-chalk-type paints and sealers will grab the heck out of the Inlay carrier sheet and won't let go if allowed to dry. Some will work fine as long as you remove as soon as it’s dry to the touch. Timing is key when using polymer-based products with IOD Paint Inlays. Consult with your IOD stockist and remember to test in an inconspicuous place.
Visit the Official Iron Orchid Designs Paint Inlay 101 page for a videos, tips, complete how-to's, and more!
________________________________
Visit us locally at Morning Dewdrops by Terri Stephens at Booth 138 at From Me To You Antiques & Collectibles, Alexandria Mall, 3437 Masonic Dr., Alexandria, LA 71301 (Tues-Sat 11:00 am to 6:00 pm CST)
___________________________________
Morning Dewdrops Disclaimer - We offer DIY Paint and Finishes and Artisan Enhancements products. We provide tips or answers to questions about these products when working in conjunction with each other.
We do not provide these tips or answer these questions pertaining to any other brands of paint topcoats, sealers, waxes or other finishing products.
To learn more, subscribe to our YouTube channel and sign up for our Morning Dewdrops mailing list and/or digital journal - Morning Dewdrops, The Art of Doing.
It’s a WIN WIN with DIY Paint, the Paint named after Us!
Stay Creative, Terri!